In my prior post which is Part-1, I described two methods for how to take desktop screenshot. I named those two methods are Method-1 and Method-2. Now in this post, I will cover the remaining two methods which are Method-3 and Method-4. So please read the whole post carefully.
Method-3:
How to Take Desktop Screenshot by Using Snipping Tool
A snipping tool is a Microsoft
Windows default software or program. Using this tool you can easily take your
desktop screen picture. Ok now, this is the question where you will find the
snipping tool?? So please don’t worry I will help you to get this default tool.
At first, you have to go to
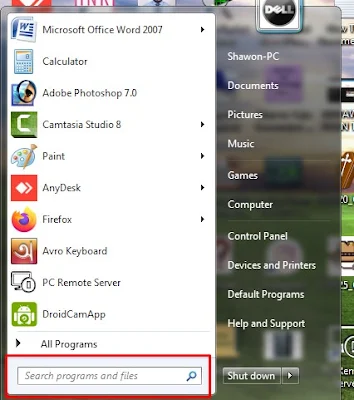
your computer start menu. Click the windows start menu icon. A new interface
will be opened. Please see those screenshots.
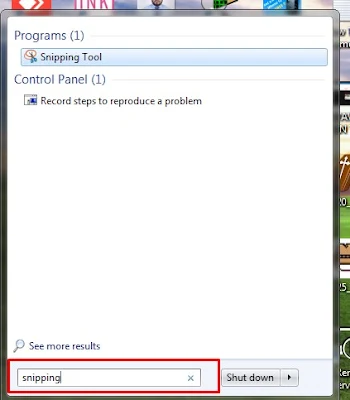
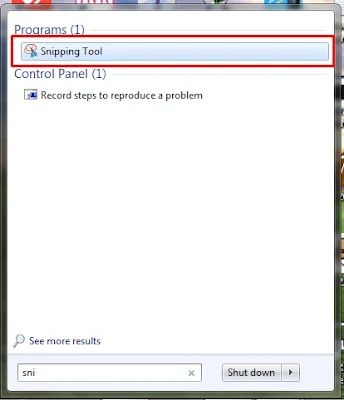
Now in the “Search programs and files” section just type “sni” or “snipping” and just notice under the Programs(1) section you will find the “Snipping Tool” with the scissor icon.
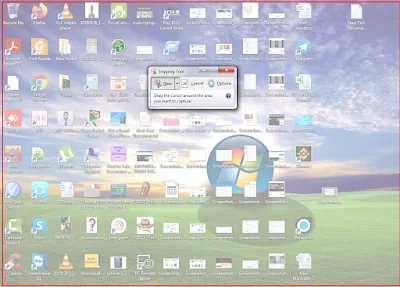
Just click the snipping tool and your desktop screen will be dimmed that means this tool is now ready to take your desktop screenshot.
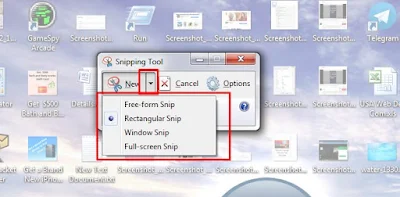
Click on the “New” right
side drop-down menu and from this drop-down menu, you will find total four
options which are “Free-form Snip, Rectangular Snip, Window Snip and the last
one is Full-screen Snip. Usually, the default selection is Rectangular Snip and it
is the most commonly used selection.
Now it is time to take the
grab your screen by using the snipping tool. So just click and hold on your
mouse's left button to drag the particular screen. When your dragging desire will be fulfilled just left the mouse left button otherwise until the dragging moment
holds the mouse left button. After leaving the holding mouse left button snipping
tool will automatically take your particular desktop screen screenshot.
Figure: Pressing and holding the Mouse Left Button
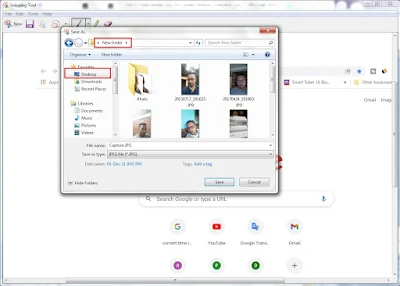
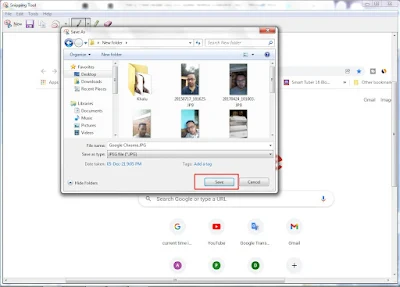
After taking the screenshot I have to save it. For saving the snapshot I can use snipping tool save option or file option, from the file option I can select “Save As” option. Please see those attached screenshots.
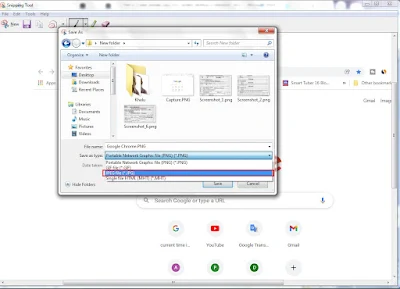
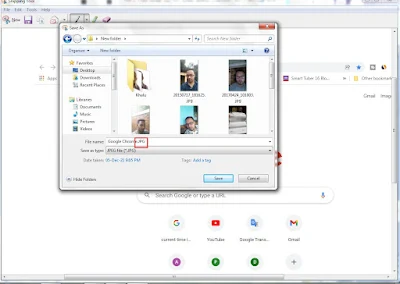
Ok, I will select my desktop “New Folder” location for saving my taken snapshot. Before saving the shot I will rename it. The default name is Capture.PNG. I will also change the file extension .PNG to .JPG . I changed the default file name Capture to Google Chrome because I have taken the Google Chrome interface shot. And also changed the default file extension .PNG to .JPG. Because .JPG is small file size and this file extension is convenient for SEO. And then click the “Save” button to save it.
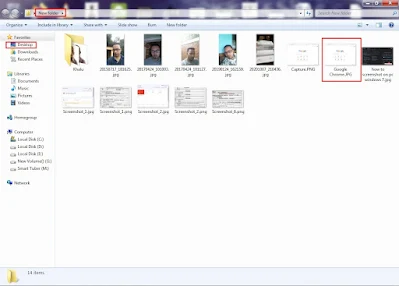
So now I have to check the saving screenshot did it really save to my desktop “New Folder” ?? I will directly go to my computer desktop “New Folder” and I found my saving screenshot Google Chrome.JPG. The .JPG letters are all capital letters this is the case may be for snipping tool .
So this is Method-3, How to
Take Desktop Screenshot by Using Snipping Tool.
Method-4:
How to Take Desktop Screenshot by Lightshot
I have already described
three methods. Now I will talk about the last method which is Method-4. Personally
I use this method to take my desktop screenshot in my everyday life. And this
method very easy and also very convenient for me to take my desktop screenshot.
I am talking about the Lightshot. Lightshot is not a windows default software
like Paint Tool. You have to download and install it. Don’t worry I will
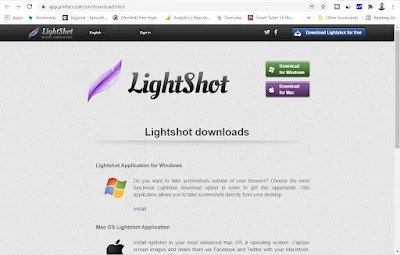
include the Lightshot download link from where you can download it. Go to and
download the Lightshot from below this link.
There are 4 options you can
download it. Those are Lightshot Application for Windows, Mac OS Lightshot
Application, Ubuntu Lightshot Application, and the add-on or extension for
Google Chrome. Those options are developed for different OS that means different
Operating Systems and the Lightshot has been made for those supported Operating
Systems.
Ok now let’s go to our main
point. The installation process of Lightshot is very easy like any other
software. I think I don’t need to discuss the installation process of
Lightshot. After completing the Lightshot installation you can find it from
your computer start menu. Just type here Lightshot on the “Search Programs and files”. Or you
can find it from the Start Menu right-hand side upper arrow icon. Just click on
the upper arrow icon. You will find the Lightshot violet color leaf logo. And
it is a shortcut of Lightshot. Please see the attached screenshot.
Ok now let's move on to How to Take Desktop Screenshot by using
Lightshot. By using this software taking screenshot is very easy. Just
press your keyboard “Print Screen” button. The whole of your computer or
desktop background will be dimmed which means the Lightshot is ready to take the
snapshot of your desktop screen.
So just click and hold on
your mouse's left button to drag the particular screen. When your dragging desire
will be fulfilled just left the mouse left button otherwise until the dragging
moment holds the mouse left button. After leaving the holding mouse left button Lightshot
will be automatically taken your particular desktop screen photo. Which is very
convenient for taking your screen capture by using this tool. And this is why I
like this software very much.
After taking the screenshot
I have to save it. For saving the snapshot I can use this tool save option or
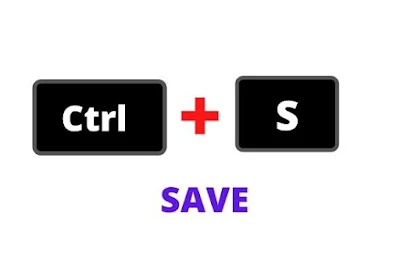
just press your keyboard Ctrl+S button to save the screenshot.
Personally, I use this tool
“Save” option. I don’t use the keyboard shortcut Ctrl+S button. Because if I use
keyboard shortcut I will not know where my screenshot will be saved. It will
save your image to the default selection location. So I prefer the Lightshot manual
“Saving” option.
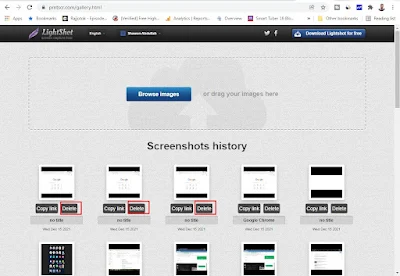
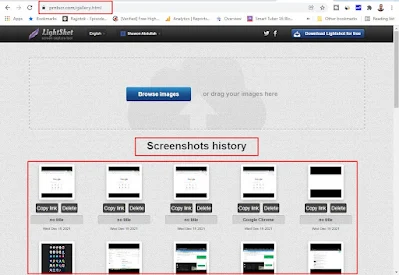
There is an upload option to upload the screenshot. And also you can upload your picture manually in Lightshot by creating a Lightshot account. Creating a Lightshot account is very easy. You can create a Lightshot account by Facebook. There is a Gallery where your all pictures or images will be stored. All of the screenshots have particular links and you can just click on the Copy button to share your link with anyone or your clients. And if you want to delete the screenshots just click on the delete button to delete the screenshot. And you can add a title to your image or rename your image. I changed my screenshot name to Google Chrome. Please see these screenshots below.
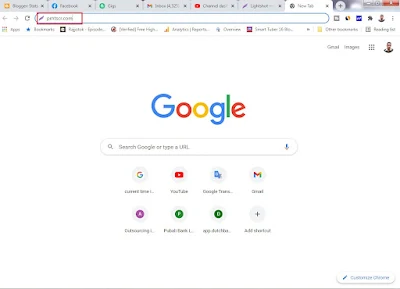
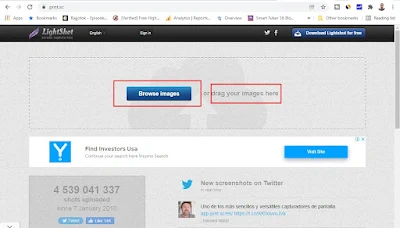
To upload any photo just type in the Google Chrome address bar prntscr.com. Using the Browse images feature or just dragging your images here you can easily upload any shot or image to the Lightshot gallery. To upload any photo just click the Browse images feature or just use drag and drop by using your computer mouse left button exactly the same as the taking screenshot process.
As an example, I want to
upload Screenshot_1.jpg image from my computer so I will use the Browse images
feature or I can use drag and drop. After successfully uploading the shot a
shareable link will be created like the attached screenshots. You can also
share your snapshot on social media by using this shareable link. To check
your uploaded photo just click on the Sign-in option to go to the Lightshot
Gallery. From the Gallery under the Screenshots history, you will find all of
your uploaded photos or images.
There is a small g icon. By
using the g icon you can find similar images from google. I didn’t use this
feature before. So I am not clear about this. At the right-hand side of the g icon, a
social share icon is available. You can use this icon to share your image on the social platform. Please watch this video from 9 minutes 20 seconds.
Also, a pen icon is available in Lightshot. Using the pen tool or pen icon you can draw anything to your screenshot. The line tool is another feature of this software. With the Line icon, you can draw a straight line, horizontal line and vertical line as per your wish.
There is also an arrow icon to indicate any important point. You can change the arrow icon color from the color box. Drawing an arrow is very easy. Just drag and drop your mouse from left to right, right to left, upper to bottom, bottom to upper. Please see this attached screenshot.
There is a Rectangular icon
to mark the important point. You can also change the rectangular color from the
color text box. Another feature tool is the Marker icon. You can give any color as
your wish to indicate any important part to your picture or image. This
color will be set as a background color.
From the text feature, you
can insert a text box to write anything or add text to your screenshot or
screenshots. You can also add text color from the color changing box and it is
possible to add a custom color. At the bottom side which is under the color box, you will find an anti-clockwise arrow sign which is undo just click on this
icon to go to the undo or just press the keyboard Ctrl+Z button.
Using all features of this desktop app is very easy and convenient for anyone. For those features of Lightshot, I like most this software very much. For this post, it was my main attraction so I described it all functionality at the end of the post Method-4.
I have fully described about
the whole process of 4 Best Easiest Ways How to Take Desktop Screenshot. I have
divided this post into two parts Part-1 and Part-2. Otherwise, this post will be
very long and you will be bored to read this whole post. I tried to give my
best effort to write every step of How to Take Desktop Screenshot in detail.
If you are confused anywhere please leave a comment in the comment section
below. I will try to reply promptly. I appreciate your any criticism. Your
comment will help me to write a new post. Thanks for your patience to read the
whole post and thank you very much.




















0Comments